
The Head Grower's Mold Prevention Checklist for Commercial Cannabis (Cycle-Stage Playbook)
A commercial cannabis mold prevention checklist runs in five cycle stages, not one cleaning pass. Reset the empty room before plants arrive, hold veg at moderate humidity, step humidity down as the canopy closes in flower, scout bud density hardest in the final weeks, then sanitize every surface between harvests. At each stage you log product, dilution, contact time, and an air reading so a state inspector sees a trail. Because most systemic pesticides are prohibited on cannabis, prevention and EPA-registered surface disinfection carry the load that a conventional crop hands to a spray.
One failed pre-sale yeast and mold test on a six-figure harvest costs more than five years of a proper sanitation program. That single number is why a head grower running an established multi-room operation treats mold prevention as crop insurance, not a line item, and it is the number to forward upstairs when an owner asks why the checklist exists. The problem is rarely that a grower does not clean. The problem is that the cleaning is inconsistent between harvests, the protocol changes after every scare, and nothing is written down in a form that survives a biannual inspection. This page fixes the inconsistency. It is the specific step list, keyed to the stages of an eight to sixteen week flowering cycle, that removes guesswork between harvests.
If you arrived looking for the state threshold you have to pass, the compliance numbers live on the cannabis yeast and mold testing thresholds page, and if you manage a single room where the real cost is turnover downtime, the facility manager room turnover checklist is built for that. Everyone else, read on, head grower first.
Why generic mold checklists fail commercial cannabis rooms
Search "mold prevention checklist" and the top results are a home spring-cleaning list, two microgreens guides, a commercial building maintenance post, and a handful of forum threads. Not one targets a commercial cannabis head grower running multiple rooms. The closest cannabis result is a ten-item listicle, not a stage-gated checklist. The keyword is functionally uncontested for this intent, which is good news for ranking and bad news for any grower who tried to adapt one of those pages to a flower room.
The home-cleaning pattern breaks first. A residential checklist tells you to keep humidity low and inspect the bathroom, and it closes by recommending a professional mold inspection. Useful for a house. Useless for a room with living plants in it, because the entire premise of a home checklist is an empty, static space you dry out and walk away from. A flower room is occupied for weeks, the humidity target changes week to week, and the chemistry you reach for is constrained by what is legal to apply with a plant present. A home checklist never once asks whether the disinfectant you picked is labeled for use around a crop.
The microgreens pattern breaks on time. One of the deepest competitor pages, a roughly 5,900-word microgreens guide published January 30, 2026, stages its content across pre-plant, germination, growing, and post-harvest, which is exactly the format signal a checklist query rewards. But a microgreens crop cycle is about ten days. It opens by defining the category: "Mold is a type of fungus that grows in warm, moist, dark environments with poor air circulation." True, and it never leaves that generic frame for a sealed commercial cultivation space where the risk window moves across a two to four month flowering cycle. Its humidity advice, "Aim for humidity levels between 40 to 60% by using a dehumidifier if needed for best results," is a single static band tuned to a ten-day tray, with no late-flower step-down for the weeks when a cannabis canopy is densest and Botrytis pressure is highest. Steal the staged format. Throw out the timeline.
The building-maintenance pattern breaks on compliance. A facility checklist handles leaks, drainage, and HVAC, and it stops there. It never references a state-mandated yeast and mold threshold because an office building does not have one. A cannabis room does, the number varies by state, and the whole point of the sanitation protocol is to hit that compliance target with evidence. A checklist that ignores the thing you are being tested against is not a cannabis checklist.
So the format from the microgreens and home pages is worth keeping, staged stages and a room-by-room spine, and everything underneath it has to be rebuilt for a cannabis flower room on a real cycle with real regulators. That rebuild is the rest of this page.
The four conditions mold needs, and the two you actually control
Mold needs four things: moisture, warmth, poor air circulation, and darkness or insufficient light. In a sealed flower room, warmth and light are set by your cultivation plan, so you are not going to starve mold by running the room cold or flooding it with light. That leaves two levers you control every single day: moisture and air movement. Every stage checklist below is, at its core, a moisture-and-airflow discipline with a sanitation layer on top.
Moisture is the number one factor, and in a flower room moisture is not just the water you pour. It is transpiration from a closed canopy, condensation on cold surfaces, standing water in trays and reservoirs, and the humidity spike that follows every irrigation event. Relative humidity is the headline gauge, but the quiet killer is vapor pressure deficit, the gap between how much water the air could hold and how much it does. A dense late-flower canopy sits in a microclimate that can run ten to fifteen points wetter than the room sensor on the wall reads, which is why a grower can trust a hygrometer and still find Botrytis in the middle of a cola.
Air circulation is the second lever and the cheapest one. Gentle, continuous airflow strips the boundary layer of humid air off leaf and bud surfaces so spores never get the still, wet film they need to germinate. Not a gale pointed at the plants, which causes wind-burn and dries the medium unevenly, but steady movement from oscillating fans that keeps every surface in the room from staying wet too long. Darkness you cannot remove during flower, so airflow and moisture control carry the whole prevention load during the riskiest weeks.
Hold this framework in your head for the rest of the checklist. Each stage below is really a question: what are moisture and airflow doing right now, what is the sanitation job for this stage, and what did I write down to prove it. The products change by stage, the targets change by stage, but the physics does not.
Stage 1 and 2: pre-cycle room reset and veg
Stage 1, pre-cycle room reset, before plants come in
This is the one stage where the room is empty, which means it is the one stage where you can use the full chemistry toolbox without a plant in the way. Do not waste it. The empty room is where you reset the pathogen load to near zero so the next crop starts from a clean baseline instead of inheriting last cycle's spores.
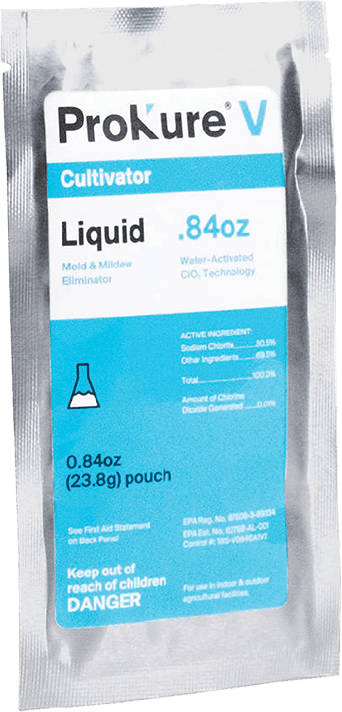
Run the deep clean in sequence. Clear all plant debris, media, and trash first, because disinfectant on top of organic matter is wasted disinfectant. Pre-clean visibly soiled surfaces with a non-disinfectant cleaner so the organic load is gone before you disinfect. Then disinfect every hard, non-porous surface: benches, trays, walls, tool racks, drip lines, and the floor. ProKure V is a liquid Hospital-Type Disinfectant, EPA Reg. No. 87508-3-89334, used at an exposure time of 10 minutes at 100 ppm to disinfect hard, non-porous surfaces against a labeled kill list that includes Botrytis sp., Penicillium digitatum, Fusarium solani, and Aspergillus niger. It leaves no residue, so you are not rinsing a film off every surface before plants go back in.
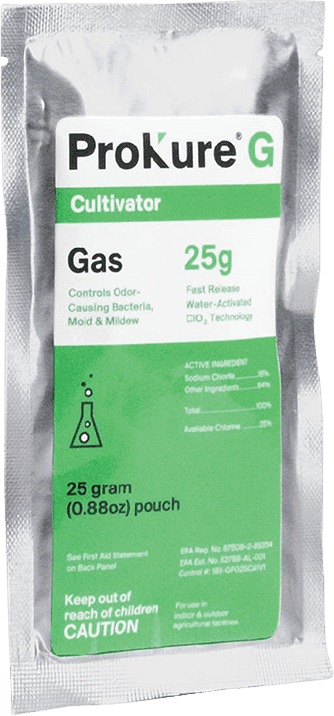
Do not skip the air and the ductwork. HVAC coils, drip pans, and ducts are the reservoir that reseeds a room you just scrubbed. An empty-room gas-phase reset reaches the surfaces a mop cannot. ProKure G is a fast-release gas Deodorizing Delivery System, EPA Reg. No. 87508-2-89334, that works in 4 to 6 hours to address mold, mildew, and odor-causing bacteria between cycles in an empty room. Its label carries the verbatim federal disclaimer "Not for use with/on plants/crops/feed," which is exactly why Stage 1, with no plants present, is the correct window for it. People and pets must not be in the room during a G treatment, and you ventilate and restore lights for an hour before re-entry.
Close the stage with a baseline. Pull an air sample and, if you run them, ATP surface swabs so you have a clean-room starting number to compare every later reading against. Then write the log entry: date, room, each product by name and EPA registration number, dilution, contact time, operator initials, and the baseline reading. That one entry is the foundation of the audit trail, and it is the thing no competing checklist tells you to capture. For the full room SOP that wraps this mold piece into the complete turnover, the head grower between-harvests SOP is the parent document; this checklist is the mold-specific spine inside it.
Stage 2, veg room, plants in, low mold risk
Veg is the low-pressure stage, which makes it the stage growers get complacent in and seed problems they pay for in flower. The canopy is open, airflow moves freely, and relative humidity runs high on purpose to push vegetative growth, often in the mid-60s to low-70s percent. High humidity plus an open canopy is tolerable here only because bud density is not yet trapping moisture. Keep oscillating airflow continuous even though the room feels safe, because the habit you build in veg is the habit that saves the crop in week eight.
Start clean and stay clean. Pathogen-tested mothers and clones keep you from propagating a problem across a whole room of rootless cuttings, and a single infected mother can seed every clone that comes off it. Screen incoming genetics, quarantine new arrivals, and never let a cutting from an unknown source skip straight into the veg room. Tool hygiene between rooms matters most here: scissors, stakes, and hands that move from a flower room back into veg carry spores against the direction you want them traveling. Disinfect tools between rooms with the same hard-surface ClO2 liquid, and dedicate footwear or run footbaths at room entries. The audit entry for veg is lighter, scouting notes and any tool or surface sanitation, but it is still an entry.
Stage 3, 4, and 5: flower, pre-harvest, and post-harvest
Stage 3, early to mid flower, canopy closes and risk climbs
The moment the canopy closes is the moment the room changes character. Airflow that moved freely in veg now has to fight through a wall of foliage, and the interior of the canopy becomes a still, humid microclimate that the room sensor never sees. Three disciplines carry this stage. First, defoliation on a cadence: strip the lower and interior fan leaves that block airflow and hold moisture, timed so the canopy breathes without over-stressing the plants. Second, a humidity setpoint step-down: begin walking relative humidity down from the veg range toward the low-50s and below as flowers form, because the dense tissue that is forming is exactly what Botrytis wants. Third, a weekly walk-through scout: eyes and hands in the canopy every week, checking the densest colas and the lowest, least-ventilated corners of the room, because that is where the first lesion shows.
This is also where the fog question comes up, so answer it by room state, not by reflex. A gas-phase or fogging treatment that carries a "not for use with plants, crops, or feed" restriction belongs in an empty room, not a flowering one. With plants present, surface disinfection on hard, non-porous surfaces, benches, walls, trays, and tools, is the job, and a residue-free ClO2 liquid labeled suitable for use with plants in the room is what makes that possible without evacuating the crop. ProKure V is labeled suitable for use with plants in the room and leaves no residue, the combination bleach and quaternary ammonium cannot claim. Keep its EPA registration and SDS on file for the stage, and log every surface pass.
Stage 4, late flower and pre-harvest, the highest-risk window
Weeks seven and beyond are where crops are lost. The buds are at maximum density, transpiration is still high, and a single Botrytis infection in the core of a cola can hollow out a top before anyone sees it from outside. Hold relative humidity at its lowest sustainable setpoint for the strain, often the mid-40s to low-50s percent, and keep airflow steady through and under the canopy. Scout bud density hardest now: squeeze and inspect the biggest, densest colas, because the fluffy ones are not the ones that rot from the inside.
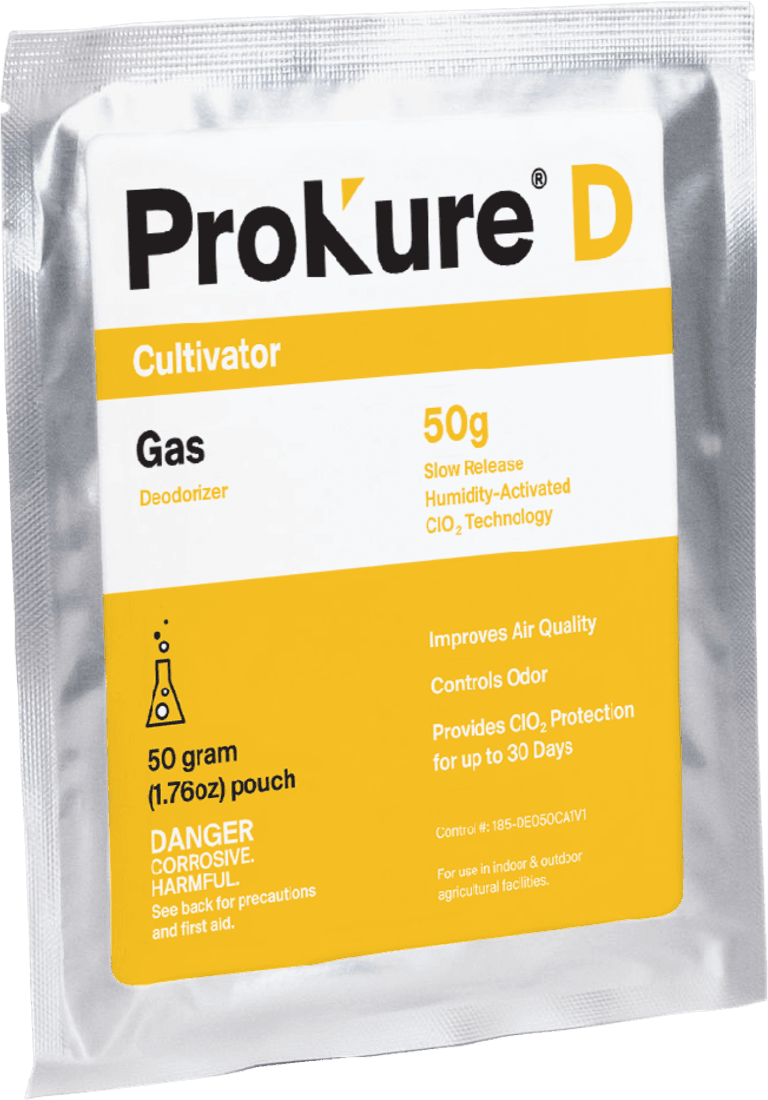
Chemistry restrictions are tightest here, and this is the Q40 compliance point that no competing checklist states plainly. With mature buds present, you cannot reach for a gas-phase product that carries the "Not for use with/on plants/crops/feed" disclaimer, and you cannot reach for bleach or a quat that leaves residue on flower headed for a lab. The plants-present, residue-free hard-surface ClO2 liquid is the only disinfection that fits the room state. For the ongoing air layer across the final weeks, a slow-release product earns its place. ProKure D is a slow-release gas that provides ClO2 protection for up to 30 days to improve air quality and control odors while plants are in the room. It is not an EPA-registered product and not labeled for sale as a pesticide under 40 CFR, it makes no kill claim, and it is an air-quality layer, not a disinfectant. Used as the canopy-hung air-quality maintenance across a full cycle, D is the air half of the system that, with G, drives the majority of what growers reorder. Close Stage 4 with a pre-harvest air quality test captured as a compliance record, so the number that matters is on file before a single plant comes down.
Stage 5, post-harvest, drying, curing, and packaging
Harvest does not end the mold risk, it relocates it. A dry room packed with wet biomass at the wrong humidity is the single fastest way to turn a clean grow into a failed test at the last step. Hold the dry room in a narrow band, typically high-50s to low-60s percent relative humidity with gentle, even airflow that never blasts the hanging flower, slow enough to dry evenly and fast enough that surfaces never stay wet. Between hangs, surface-sanitize the dry room, trellis, hooks, and trays with the residue-free hard-surface disinfectant, because the same biomass that cured well last week left spores on every surface it touched.
Packaging hygiene is the last gate. Sanitize packaging-area surfaces and tools, keep the room dry, and do not reintroduce contamination at the moment the product is closest to sale. Then run the final yeast and mold test before you release a certificate of analysis. The threshold you have to clear varies by state, and the current numbers live on the cannabis yeast and mold testing thresholds page, so confirm your state's number rather than assuming a figure. The staged checklist exists to make this final test boring.
The chemistry chart: what you can use, when, and why
Every ranking page in this space either recommends a do-it-yourself hydrogen peroxide or vinegar spray or recommends a bleach-analog cleaner, and none of them discuss EPA registration or the restriction language that decides whether a product is legal to apply with a crop present. For a commercial grower making claims on a regulated product, that omission is the whole game. Here is the chart by room state.
With plants present, hard surfaces only, use a liquid chlorine dioxide (ClO2) disinfectant labeled suitable for use with plants in the room. ProKure V, EPA Reg. No. 87508-3-89334, is a Hospital-Type Disinfectant that kills mold and mildew commonly found in greenhouses and indoor and outdoor agricultural facilities, kills SARS-CoV-2 on hard non-porous surfaces in 30 seconds, is suitable for use with plants in the room, and leaves no residue. That combination, a broad hospital-type kill list plus plant-safe, residue-free application, is what bleach and quats cannot claim, and it is the reason a cultivator picks V for between-cycle and in-cycle surface turnover. Activate with water, apply for direct application, no wipe, no rinse, no residue, at an exposure time of 10 minutes at 100 ppm for the disinfectant claim.
Empty room, fast air and odor reset, use the fast-release gas. ProKure G, EPA Reg. No. 87508-2-89334, is a Deodorizing Delivery System: the solution for mold and mildew, odor-causing bacteria, and chemical odors, with deep-penetrating ClO2 vapor that works in 4 to 6 hours. Its instructions carry the verbatim disclaimer "Not for use with/on plants/crops/feed," so it is a between-cycle, empty-room tool and never an in-flower one.
Occupied room, ongoing air quality across the cycle, use the slow-release gas. ProKure D provides ClO2 protection for up to 30 days and improves air quality and controls odors. It is not an EPA-registered product and not labeled for sale as a pesticide under 40 CFR, it carries no kill claim, and it runs with plants in the room as the hands-off air-quality layer. Keep the "up to" qualifier; it is an up-to-30-day protection window, not a flat thirty days, and there is no rotation or alternation schedule on the label, so do not run one.
The do-it-yourself tier, hydrogen peroxide and vinegar, is where the microgreens and home pages live. It is fine for a hobby tray and it does not scale to a commercial room making compliance claims, because a homemade spray has no EPA registration to cite in an audit log and no label kill list to stand behind. One safety line from those pages is worth repeating because it is correct: never mix vinegar and hydrogen peroxide in the same container, which creates peracetic acid. Bleach and quaternary ammonium stay in the toolbox for empty-room, non-plant surfaces, but bleach leaves residue and corrodes, quats leave a residual film, and both carry the not-for-use-with-plants restriction, so they never touch an occupied flower room. For the full bleach-versus-ClO2 breakdown, the chlorine dioxide versus bleach comparison carries it. Educate here, buy the ClO2 line on shop.groclarity.com, and pull labels, SDS, and EPA registration detail from prokuresolutions.com.
The audit trail: logging sanitation for state inspectors
The layer no competing checklist covers is the one a state inspector opens first. A clean room is necessary and not sufficient; what satisfies a biannual inspection is a documented trail that shows the clean room was produced on purpose, repeatedly, with legal products. Under a seed-to-sale tracking regime, inspectors expect records, and a sanitation log is the record most growers do not keep in a usable form.
Log every sanitation event with six fields: product name, EPA registration number, dilution, contact time, operator, and timestamp. Product name and EPA registration number prove the chemistry was legal and labeled for the surface. Dilution and contact time prove it was used at the concentration and dwell the label requires, 100 ppm at 10 minutes for the hard-surface disinfectant claim, not a quick wipe. Operator and timestamp tie the event to a person and a moment, which is what turns a log from a story into evidence. Pair the sanitation log with an air-quality log and your scouting notes, and the three together reconstruct the whole prevention program for any week an inspector asks about.
A workable template is a single table, one row per event, columns for each of the six fields plus the room and the stage. Keep it where your compliance records live so it maps cleanly to the state tracking system, and retain it for the current year plus the preceding calendar years your state requires. The reason to build this now, before an inspection, is that a log reconstructed from memory after the fact convinces no one, while a contemporaneous log that matches your product purchases and your test results is the strongest compliance posture a grower can hold. The downloadable version of this five-stage checklist includes the log template, so the documentation ships with the protocol rather than as an afterthought.
For a multi-state operator, the hard part is that the approved-pesticide list and the yeast and mold threshold both differ by state, so standardize the prevention stack, the stages, the products, the logging, across the whole footprint while confirming each state's list and limits separately. A documented, standardized program is the deliverable cultivation IPM expertise is built to produce, and it is what a Cultivation Director defends to a regulator across four facilities without re-inventing the protocol in each one.
Download the checklist and pick your next step
The related search "head grower mold prevention checklist free" confirms the demand, and no page in the top ten offers a printable asset. The printable five-stage checklist packages every step above, Stage 1 reset through Stage 5 packaging, with the six-field sanitation log built in, so the protocol and its documentation ship together. Pair it with a ProKure V sample kit shipped to your facility to run the plants-present surface disinfection on your own benches before you standardize it.
Then pick the handoff that matches your job. If your gap is between-cycle downtime, cut room turnover with the facility manager room turnover checklist. If you need the state number the protocol has to hit, the cannabis yeast and mold testing thresholds page has it by state. If you are deciding why not just use bleach, the chlorine dioxide versus bleach comparison settles it. If you are standardizing across a multi-state footprint, the multi-site IPM standardization guide scales this checklist across states. And if you want the full room SOP that this mold piece sits inside, the head grower between-harvests SOP is the parent. To scope the program end to end, reach GroClarity at 866.206.1301 or order the ClO2 line on shop.groclarity.com. Built on science, backed by results.
Related resources