
The 6-Step Cannabis Cultivation Customer Journey: What to Expect When You Partner with GroClarity
The six-step cannabis cultivation customer journey is the path a licensed facility walks from first contact to an ongoing, documented air-quality program: an IPM and biosecurity assessment, a protocol design with EPA-compliant product selection, a between-cycle room turnover SOP, in-cycle monitoring with air-quality data, pre-harvest verification with audit-ready records, and a post-harvest review that standardizes the next cycle. It is a relationship and a timeline, not a plant-growing guide. Each step produces something you keep (a report, a protocol, a log, a trend line) so that by the end you can prove to an auditor and to ownership that the facility's air and surfaces were managed.
Why a customer journey beats a grow guide for licensed cultivators
Search "6 step cannabis cultivation" and nearly everything you find is a grow guide for home growers. One of the most-read ones opens by asking, "Are you ready to grow your own weed at home?" Another frames its whole piece around plant biology, calling the vegetative stage "one of the most crucial parts of your cultivator process." Those pages are useful for a hobbyist deciding on grow lights and nutrients. They are not written for the person running a licensed facility who already knows how to grow and is being judged by a state lab on whether the finished flower passes a yeast and mold test.
That is the gap this page fills. If you run a commercial cultivation operation, your "journey" is not seed to harvest. It is the relationship and the process of moving your facility from mold risk to a documented, compliant biosecurity program, and the steps are about what working with a biosecurity partner actually looks like, week by week, deliverable by deliverable. The plant knows how to grow. The question is whether your rooms, your air, and your records are clean enough that the crop you grew well does not fail at the gate.
This matters because the stakes at a licensed facility are different in kind, not just degree. A home grower who loses a plant to bud rot is out a plant. A commercial operator who fails a pre-sale total yeast and mold test loses a batch that already carries the full grow cost, and in a bad case loses standing with a regulator. The grow guides on the first page of search results do not address state compliance thresholds, between-cycle room turnover downtime, EPA label constraints, or the audit trail an inspector asks for. Those are the exact things a licensed cultivator loses sleep over, and they are the spine of this journey.
Consider the difference in failure modes. When a hobbyist's plant gets moldy, the feedback loop is immediate and the cost is a weekend's disappointment. When a commercial facility's airborne mold load drifts up over three harvests, the feedback loop is a lab result weeks after the money was spent, and the cost is a destroyed batch plus a reportable compliance event plus the scrutiny that follows. The commercial operator is not trying to grow a good plant; they already can. They are trying to make sure that the good plant they grew does not fail at the one gate that stands between a finished harvest and revenue, and that failure is invisible, slow, and expensive in a way a home grower never faces. A journey built for that problem has to be about systems and evidence, not about grow lights and nutrients.
The other structural difference is accountability. A home grower answers to themselves. A Head Grower answers to an owner and a regulator, a Facility Manager answers to a production schedule, a Cultivation Director answers for a whole footprint, and a Procurement lead answers for what is on the shelf when an auditor walks in. Every one of those people needs not just a clean room but a record that the room was kept clean, because in a licensed industry the thing you cannot document might as well not have happened. That accountability is why this journey is organized around deliverables you keep rather than advice you absorb.
A quick word on who this is for and what it is not. This page is written for the Head Grower responsible for crop health and pre-sale testing, the Facility Manager running room turnover and sanitation scheduling, the Cultivation Director coordinating protocols across a multi-state footprint, the Owner weighing prevention as an investment, and the Procurement or QA lead who needs SDS, EPA labels, and a clean reorder path. It is not a plant-lifecycle guide and it is not a product spec sheet. For deep product detail, labels, and safety data sheets, those live on prokuresolutions.com, and the buy path is on shop.groclarity.com. This page is the map of the relationship in between.
It also answers the quiet question that sits under all of this, which is what ClO2 even is. Chlorine dioxide is the chemistry the ProKure line is built on, and not understanding it is one of the most common reasons cultivators hesitate. The short version is covered in the steps below and expanded where the journey reaches product selection; the point here is that the journey is designed to teach you the chemistry as you go, not to assume you already know it.
There is a reason the grow guides and the service journey never converge, and it is worth naming because it explains why you had to come looking for this page. The economics of content on this topic push every writer toward the home grower. The home-grow audience is enormous, the affiliate revenue on grow lights and nutrients is real, and a 5,900-word "ten step" grow guide monetizes beautifully. The licensed-operator audience is smaller, the questions are harder, and the answers are about compliance and documentation rather than gear. So the search results fill up with hobbyist guides, and the operator searching the same words gets content written for someone with a very different problem. That is not a failure of the grow guides; they are good at what they do. It is a gap, and the gap is this page.
The other reason to frame this as a journey rather than a transaction is that biosecurity is not a product you buy once. A cultivator who buys a case of disinfectant and sprays it around has not bought a biosecurity program any more than buying a smoke detector makes a building fireproof. The value is in the sequence: diagnose, design, operate, measure, verify, standardize. Each step depends on the one before it, and the documentation each step produces is what makes the next step defensible. Treating it as a relationship with stages is not marketing framing; it is an accurate description of how a facility actually moves from mold risk to a program that holds up under audit.
The 6-step framework at a glance
Before the detail, here is the whole arc, so you can see where each step sits and roughly how long it takes.
Step 1 is the IPM and biosecurity assessment. We walk your facility, look at surfaces, air handling, water, and staff protocol, and review your recent yeast and mold results. You come out of it with a written baseline and a prioritized risk map. This is the diagnosis before any product is chosen.
Step 2 is protocol design and EPA-compliant product selection. With the baseline in hand, we design the sanitation and air-quality protocol and match the right ProKure product to the right job, with the EPA label rules stated up front rather than buried. This is where the plan becomes specific to your rooms.
Step 3 is the between-cycle room turnover SOP. This is the operational heart for a Facility Manager: the sequenced, time-boxed protocol for resetting a room between crops so turnover stops eating 3 to 5 days of downtime.
Step 4 is in-cycle IPM monitoring and air-quality data. Once a crop is in, the program runs and you measure it, building the data trail that proves the air was managed rather than assumed.
Step 5 is pre-harvest verification and audit-ready documentation. Before the crop goes to its compliance test, you confirm the room held and you assemble the records an auditor wants to see.
Step 6 is post-harvest review and next-cycle standardization. You close the loop, learn from the cycle, and standardize the protocol so the next cycle, and for an MSO the next facility, runs the same proven way.
The whole engagement is a relationship, not a one-time transaction. Steps 1 and 2 are the setup, Steps 3 through 5 repeat every cycle, and Step 6 is what turns a good first cycle into a facility standard. The duration of the setup is measured in weeks; the cycle steps run on the rhythm of your grows.
One way to read the framework is by what you hold in your hand at the end of each step, because a journey that produces nothing you keep is just a sales process. Step 1 produces a written baseline and risk map. Step 2 produces a written protocol with compliance notes. Step 3 produces a turnover SOP and the first cycle's turnover log. Step 4 produces the in-cycle air-quality readings and the running log. Step 5 produces the assembled audit package. Step 6 produces the standardized, improved protocol for the next cycle. Six steps, six artifacts, and together they are the documented program a regulator credits and an owner can see the value of. If someone offers you a "biosecurity program" that produces no documents, they are offering you a product sale wearing a program's clothes.
Another way to read it is by which steps are one-time and which repeat. The assessment and the protocol design happen once at the start and then only get revisited when the facility changes (a new room, a new strain program, a new state). The turnover, the monitoring, and the verification repeat every single cycle, because they are the operating rhythm of a clean facility. The post-harvest standardization happens each cycle too, but its weight grows over time, because each cycle's review sharpens the standard the next cycle runs. That is why the program gets easier and more defensible the longer you run it: the repeating steps become routine, and the standard they run against keeps improving.
On timing, it helps to set expectations honestly rather than promise a number that does not survive contact with a real facility. The setup phase, Steps 1 and 2, is measured in weeks: an assessment walk, a written baseline within about ten business days, and then a protocol design that depends on the complexity of the facility. A single-room grow with a clean history designs fast; a multi-room facility with a history of failures and a tangle of legacy sanitation practices takes longer, because the diagnosis has more to untangle. The cycle phase, Steps 3 through 5, runs on the clock of your grows rather than a calendar we impose, because turnover happens when a room empties and monitoring happens across the weeks a crop is in. Step 6's review lands at the end of each harvest. The honest summary is that the first full loop takes one grow cycle to complete, and the program's value compounds from the second cycle on, when the setup is done and the rhythm is established.
A word on what the "typical duration per step" really means, because a timeline implies precision a living facility rarely offers. The durations are the shape of the engagement, not a contract: an assessment is days, a protocol design is a week or two, a turnover is a shift, an in-cycle monitoring phase spans the grow, verification is a pre-harvest check, and standardization is a post-harvest review. The useful thing to take from the timeline is not the exact day count but the sequence and the dependency, that each step feeds the next, and that the repeating middle steps are short and routine while the bookend setup and standardization steps are where the thinking happens.
Step 1: The IPM and biosecurity assessment
Everything starts with a diagnosis, because you cannot design a protocol for a facility you have not seen. Step 1 is the assessment, and it is deliberately done before anyone recommends a product, so the recommendation is grounded in your actual rooms rather than a generic template.
What we look at is the whole biosecurity surface, not just the canopy. Surface hygiene across benches, trays, tools, and the room structure. Air handling, including how the HVAC moves air between rooms and where spores can settle and travel. The water source and irrigation system, which is a mold reservoir most programs skip. Staff protocol, because people and tools move contamination between rooms. And your current SDS and product inventory, so we know what you are already running and whether it is being used the way its label requires.
We also review your recent history, specifically your last several total yeast and mold results. A pattern in those results tells us more than a single snapshot: a room that trends up over three harvests has a root cause worth finding, and a one-time spike has a different story. The point is to find the failing reservoir before it costs you another batch, because a positive on a mature, stored crop is a six-figure event, not a nuisance.
What you receive from Step 1 is the first thing you keep: a written baseline report, a gap list of what is failing or missing, and a prioritized risk map that tells you where to spend first. This is not a sales document; it is a diagnosis. A Head Grower can take that baseline to ownership and show, in writing, where the facility stands before anything is bought.
On timing, a typical assessment produces a written baseline within about ten business days of the walk-through, which is fast enough to act on before the next turnover and thorough enough to be worth acting on. The deliverable is the point: you end Step 1 with a document, not a verbal impression. Ten business days is also deliberate rather than arbitrary: it is long enough to do the analysis properly, including reviewing your test history and mapping the reservoirs, and short enough that the findings are still current when you act on them. A baseline that took two months would describe a facility that had already moved on. The window is set to the speed a cultivation operation actually makes decisions.
To make the assessment concrete, here is what the walk actually covers reservoir by reservoir, because the value of Step 1 is that it looks where problems hide rather than where they are obvious. On surfaces, the walk checks not just the open bench tops but the tray drainage channels, drop-down hoses, tool storage, and the structural corners a daily wipe-down skips, because those are the spots a surface reservoir survives a casual cleaning. On air, it traces how the HVAC moves air between rooms: where the returns pull from, whether the condensate pans drain or hold standing water, whether filters are on a real cadence, and whether any duct runs sit stagnant, because a shared air handler can distribute one room's problem across a whole zone. On water, it looks at the irrigation reservoir, the lines and emitters, and any standing water, because a recirculating system is a delivery network for a waterborne organism and biofilm inside the lines is a reservoir a flush does not reach.
The staff-protocol part of the assessment is the one operators underrate. People and tools are vectors: a crew member who handles an infected plant and then touches ten more without changing gloves or cleaning a blade has just done the fungus's distribution work for it. The walk looks at glove and tool discipline, the path between clean and dirty rooms, and whether the sanitation schedule is written down or lives in one person's head. A program that depends on one experienced grower remembering everything is a program that breaks the week that grower is out.
The deliverable deserves one more note, because it is what separates an assessment from an opinion. The baseline report does not just say "you have a mold risk." It names the specific reservoirs that are failing, ranks them by how likely they are to cost you a batch, and gives a prioritized order to fix them, so a facility with a limited turnaround window knows what to do first. The gap list is actionable: each item is a thing to change, not a vague concern. That is the difference between a diagnosis you can act on and a report that gathers dust.
The approachable version of this step: it is the part where someone who has actually been in a grow room walks yours, asks what is failing and when, and hands you a plain-language map of the risk rather than a chemistry lecture. That is the GroClarity promise at the front of the journey, a real person who understands cultivation, with the data on the page.
Step 2: Protocol design and EPA-compliant product selection
With the baseline in hand, Step 2 turns the diagnosis into a plan. This is where the protocol gets specific to your facility and where the right ProKure product gets matched to the right job, and it is where the EPA compliance question gets settled up front instead of discovered later.
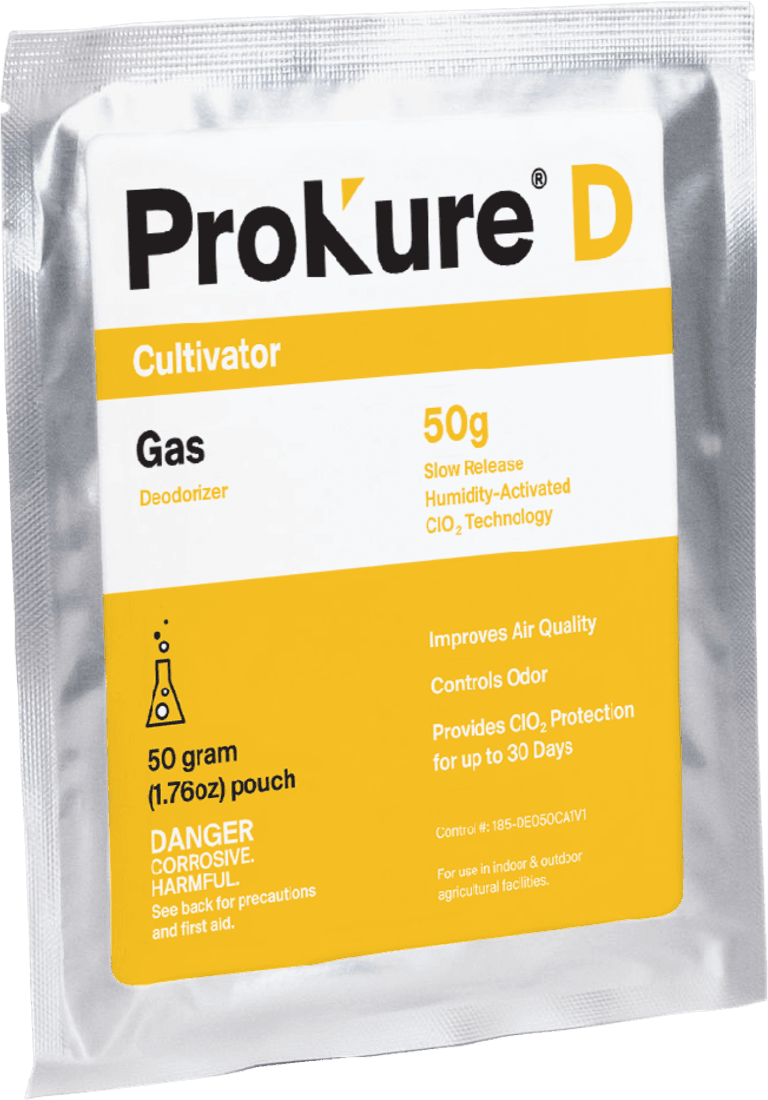
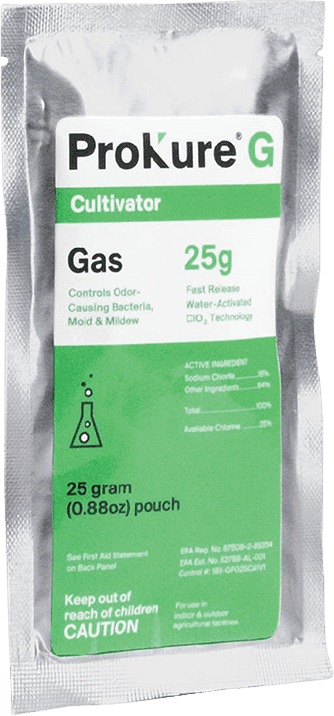
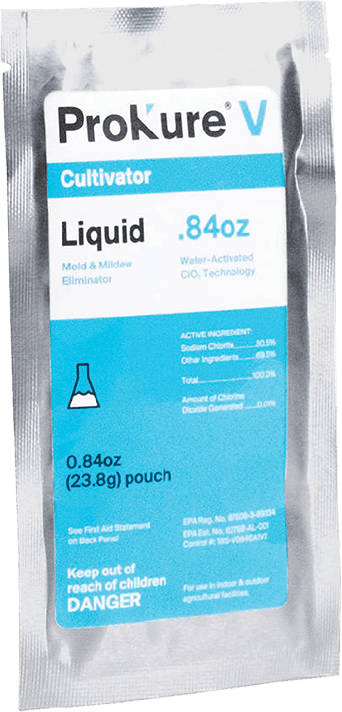
Start with the compliance constraint, because it is the thing an owner worries about most. The products in this program carry specific, locked EPA statuses, and the plan respects them from the first draft rather than treating compliance as a copyedit at the end. ProKure V is an EPA-registered liquid Hospital-Type Disinfectant (EPA Reg. No. 87508-3-89334) for hard, non-porous surfaces. ProKure G is an EPA-registered fast-release gas (EPA Reg. No. 87508-2-89334) that carries the required label instruction "Not for use with/on plants/crops/feed," which is why it runs only in an empty room. ProKure D is not an EPA-registered product and not labeled for sale as a pesticide under 40 CFR, so it is an air-quality and odor product that makes no kill claim and is not applied to the flower. That disclaimer is not a weakness to hide; it is the line that tells you which product does which job.
The reason the "Not for use with/on plants/crops/feed" language matters so much is that it governs where and when a product can run. It is a page-composition and a protocol rule, not just legal fine print: a protocol that put ProKure G in a room with a live crop would be using an EPA-registered product against its label, which is exactly the compliance failure the assessment exists to prevent. Getting this right in the design phase is why the journey separates surface work, empty-room air resets, and in-room air quality into distinct steps with distinct products.
Which product fits which surface follows from the diagnosis. Surface disinfection between cycles is ProKure V's job, on hard, non-porous surfaces, at 100 ppm for a 10-minute exposure, residue-free and suitable for use with plants in the room because it treats the surface, not the plant. A fast air reset of an empty room is ProKure G, working in 4 to 6 hours with an hour of ventilation before re-entry. Ongoing air quality in an occupied room is ProKure D, the slow-release gas that improves air quality and controls odor for up to 30 days with the plants in. The protocol names which product runs where, when, and at what point in the cycle. For the deep product detail, labels, and SDS behind each of these, the plan points to prokuresolutions.com, where that reference lives.
State-by-state variance is the last design consideration. EPA registration is federal, but state cannabis programs layer their own requirements and testing thresholds on top, and those vary by market. For a single-state operator that is one set of rules; for a multi-state operator it is several, which is why the design phase for an MSO explicitly accounts for the differences across the footprint rather than assuming one state's rules travel. A total yeast and mold cap that passes in one state may be stricter in another, and a documentation expectation an inspector enforces in one market may differ next door. The practical approach for a multi-state operator is to build the protocol to the strictest common standard and then note the per-state exceptions, so a crew in any facility is never guessing which rules apply. Designing to the strictest common standard is usually simpler to run than maintaining a different bar in every building, and it means a facility is never caught short when a market tightens its thresholds.
The design phase also sets the measurement baseline, which matters because you cannot show improvement against a number you never recorded. Part of Step 2 is deciding what gets measured, how often, and what a healthy reading looks like for your rooms, so that when Step 4 starts producing air-quality numbers there is a baseline to read them against. A program that starts measuring without a baseline can tell you today's number but not whether it is good, bad, or trending; a program that set its baseline in the design phase can read the very first in-cycle reading in context.
It helps to understand why three products exist rather than one, because the first question a cost-minded operator asks is whether they really need the whole line. The answer is that air and surfaces are different microbial problems, and a continuously occupied room and an empty room are different use conditions, and no single product legally or practically covers all of them. ProKure V kills mold and mildew on hard surfaces but is a liquid for surfaces, not an air treatment. ProKure G resets an empty room's air fast but cannot run with a crop present. ProKure D holds air quality continuously with the crop in but makes no kill claim and does not disinfect a surface. Each is doing a job the others cannot, which is why the protocol assigns each to its moment rather than reaching for one tool for everything. A program that tried to make one product do all three jobs would either overclaim a product past its label or leave one of the three jobs undone.
The chemistry under all three is the same, and the design phase is where that gets explained, because understanding it is what makes a cultivator comfortable buying. All three are chlorine dioxide (ClO2) products. ClO2 is a neutral chlorine compound that behaves very differently from elemental chlorine, and as a gas it distributes evenly through a space and reaches cracks and crevices a liquid cannot. The difference among the three products is the form and the release: V is a water-activated liquid, G is a fast-release gas, and D is a slow-release gas that runs for up to 30 days. Same active chemistry, three delivery formats matched to three jobs. The design conversation walks a cultivator through that once, so the rest of the journey is not a mystery.
A note on what the design phase deliberately does not do. It does not inflate a claim to make a sale. ProKure D is not described as killing anything, because it is not registered to, and no product in the plan is assigned a job its label does not cover. That restraint is not a limitation on the program; it is what makes the compliance story hold when an auditor reads it. A protocol built on exactly what each product's label supports is a protocol that survives scrutiny, which is the entire point of settling EPA compliance in the design phase rather than hoping it holds at the end.
You leave Step 2 with a written protocol: the products, the use sites, the sequence, and the compliance notes, ready to execute. It is the second thing you keep, and it is the document your crew runs against.
Step 3: The between-cycle room turnover SOP
Step 3 is where the journey becomes daily operations, and for a Facility Manager it is the step that pays for itself fastest. Room turnover, the empty-room window between harvest and the next transplant, is where sanitation actually happens, and it is where bleach-and-air-out practices quietly cost 3 to 5 days of downtime per room per cycle.
The problem with the old way is twofold. Bleach and quaternary ammonium leave residue and fumes, which forces crews out of the room while it off-gasses and leaves films on surfaces the next crop will touch. And the downtime compounds: a room turning four or five crops a year at 3 to 5 lost days each is giving up 15 to 25 production days a year, which for a flower room is real revenue a faster turnover gives back.
The turnover SOP sequences the reset into a tight, repeatable protocol: strip the room and remove all media and debris, pre-clean surfaces with detergent, disinfect every hard surface with ProKure V, reset the empty room's air fast with ProKure G, ventilate, and verify before you repopulate. Because V is residue-free and suitable for use with plants in the room, the surface work does not force the same evacuation-and-airing that bleach does, and because G works in 4 to 6 hours in an empty room, the air reset fits inside a turnover window rather than extending it. The result is a turnover measured in a shift rather than a week.
The deeper detail on this step, the hour-by-hour time budget and the high-risk touchpoint checklist, lives in the dedicated turnover protocol, and the journey hands a Facility Manager off to it rather than repeating the full depth here. The point for the customer journey is that Step 3 is where the program stops being a plan and becomes a thing your crew does every cycle, the same way every time, which is what turns good intentions into an auditable standard.
Why does the empty room unlock so much? Because with no crop present you can use aggressive chemistry you could never run around living plants. ProKure G works in an empty room precisely because its label forbids use with plants, crops, or feed, and the empty-room condition is what makes a fast, thorough air reset possible. The between-cycle window is the one moment the whole room is accessible and the one moment you can throw the strongest tools at it, which is exactly why a disciplined turnover does more for the next crop's cleanliness than anything you can do once the plants are back in. A facility that treats turnover as rushed janitorial work at the end of a harvest is skipping its single best prevention opportunity.
The sequence matters as much as the tools, and getting it wrong wastes the work. Strip and remove debris first, because spent media and root balls are a reservoir and carrying them back in reinfects a room you just cleaned. Pre-clean with detergent before you disinfect, because disinfectant does not work through grime and a dirty surface will not sanitize no matter how much product you apply. Disinfect surfaces with ProKure V and give it the full contact time rather than a quick wipe, because the fungicidal claim only holds at the labeled exposure. Reset the air with ProKure G while the room is empty, then ventilate the full hour before re-entry. Verify before you repopulate. Run those out of order, disinfecting before pre-cleaning or repopulating before verifying, and you have left a seam the next crop's contamination walks through.
Verification is the step most turnover routines skip and the one that closes the loop. A reset you cannot confirm is a reset you are hoping worked, so the SOP ends with a check: an ATP swab on the surfaces you disinfected for a fast pass-or-fail reading, and where the stakes justify it, an air sample for the viable mold and yeast load before you commit a new crop. That verification reading is not just operational hygiene; it is the first data point of the cycle's audit trail, and it is what lets a Facility Manager tell an owner the room came back clean with a number behind the claim rather than a shrug.
What you keep from Step 3 is the written turnover SOP itself, a document a crew lead can hand to a new hire, plus the turnover logs each cycle produces. The logs matter for the steps that follow, because a documented turnover is the first entry in the audit trail.
Step 4: In-cycle IPM monitoring and air-quality data
Once a crop is in the room, the program runs and, just as importantly, you measure it. Step 4 is the in-cycle phase, and it is where the journey builds the thing most facilities lack: a data trail that proves the air was managed.
What gets measured is the viable mold and yeast load in the room's air, expressed as colony-forming units per cubic meter (CFU per cubic meter). It is a count of living, culturable spores pulled from a measured volume of air, and it is the closest direct read you have on how much mold pressure the room is carrying while the crop is in it. Humidity tells you the condition that allows mold; the CFU reading tells you how much is actually present. GroClarity's on-site air sampling produces that number and returns it as detailed online reports.
During the cycle, ProKure D runs as the ongoing air-quality layer, hung above the canopy and replaced before its up-to-30-day window closes so the layer never lapses, while you hold humidity and airflow in band and scout the crop. The monitoring is what tells you the layer plus the environment is holding the load down, or that something changed. A reading that climbs mid-cycle is a measured reason to investigate a reservoir before the pressure reaches the flower, rather than a surprise at the finished-product test.
What gets logged is the whole picture: the CFU readings on their cadence, the environmental readings, the product placements and replacements, and any corrective action. This is the data trail, and it is the direct answer to the pain a Head Grower names most, having no documentation to prove air quality to a compliance auditor. A single reading is a snapshot; a stack of readings across the cycle is a trend line, and the trend line is the artifact that turns a verbal assurance into evidence.
For a facility that would rather have the sampling run and reported for them than train a crew to do it in-house, the monitoring can be delivered as a service. GroClarity's on-site air sampling and online reporting turn the monitoring step into something that shows up as a scheduled visit and a report in your inbox, rather than a task on an already-full crew's list. That matters for two reasons. First, consistency: a third party running the sampling the same way every visit produces a cleaner trend line than a busy crew squeezing it in between other work. Second, credibility: a reading produced and reported by an outside party carries more weight with an auditor than a self-reported number, because it is harder to dismiss as a facility grading its own work. The service path is the consultative route for operators who want the data without owning the measurement, and it is set up through a GroClarity contact.
The discipline that makes the air number useful is method consistency. A reading is only a trend if the conditions behind each sample are held constant, so you sample at the same point in the cycle, at canopy height, in the same location, with the same equipment. A number that jumps because someone sampled next to an open door during turnover is noise, not signal, and noise erodes the trust a trend line is supposed to earn. The monitoring step is as much about doing the measurement the same way every time as it is about doing it at all.
What you do with a high reading is where the monitoring earns its keep. A single high month is a prompt to investigate, not a verdict. The walk-through follows the reservoirs the assessment mapped: check the surfaces and tray drainage, pull a water sample from the reservoir and a couple of emitters, confirm the ProKure D layer did not lapse, and review whether the last turnover actually ran on schedule. The air number told you pressure rose; the walk-through tells you which reservoir let it. Fix the reservoir, re-sample, and confirm the number came back down before you trust the room again. That investigate-and-confirm loop is the difference between a program that reacts to failures and one that prevents them.
The in-cycle phase also keeps the air-quality layer honest. ProKure D is placed, held, and replaced on its up-to-30-day window, but it is not a substitute for the environment you control. If humidity runs hot and airflow is poor, mold gets its opening no matter how fresh the pouch is, so the monitoring data is also a check on whether your humidity and airflow discipline is holding, not just whether the product is present. A room whose air reading climbs while the D layer is current is a room telling you to look at the environment, which is exactly the kind of diagnostic a number gives you and a smell does not.
The deeper compliance detail, how the readings map to remediation when a result comes back high, lives in the mold and yeast load compliance resource, and Step 4 hands a reader who needs that depth off to it. On this page, Step 4 is about the rhythm: measure on a cadence, log as you go, and act on a trend before it becomes a failure.
Step 5 and Step 6: Pre-harvest verification and next-cycle standardization
The last two steps close the cycle and set up the next one, and they are where the whole journey proves its worth to an auditor and to ownership.
Step 5 is pre-harvest verification and audit-ready documentation. Before the crop goes to its mandatory pre-sale test, you confirm the room held rather than assuming it. State total yeast and mold thresholds vary by market, so what the finished flower has to pass differs by state, and a pre-harvest air reading plus the cycle's logs tell you whether you are walking into that test clean or exposed. The documentation you assemble is the record an inspector actually reads: the baseline, the protocol, the turnover logs, the in-cycle air readings, the product labels and SDS, and the corrective actions. For a grower under audit pressure, that paper trail is the difference between telling an inspector the room was managed and showing them. This is the step that converts a prevention program into defensible evidence.
Step 6 is post-harvest review and next-cycle standardization. After the harvest, you look at how the cycle went, what the air data showed, and what to adjust, and then you standardize the protocol so the next cycle runs the proven version rather than a fresh improvisation. For a single facility, that means a written standard your crew repeats. For a multi-state operator, it means the same protocol, the same product SKUs, the same verification thresholds, and the same records across every facility, so a room in one state produces the same documented result as a room in another. A Cultivation Director coordinating protocols across a footprint can defend ten facilities running one standard far more easily than ten facilities improvising, and the deeper multi-state standardization detail lives in the biosecurity consulting resource for an MSO reader.
Step 6 is also where procurement settles into a rhythm. With the protocol standardized, the ProKure V, G, and D reorder cadence can be set rather than scrambled, SDS and EPA labels kept in one place, and account-level pricing arranged for a multi-facility operation. Reorder the ClO2 line on shop.groclarity.com, pull the labels and SDS from prokuresolutions.com, and route account or volume pricing through a GroClarity contact. A standardized reorder cadence is quietly one of the biggest operational wins of the whole journey, because a sanitation program that runs out of product mid-cycle is a program with a gap, and a gap in the air layer or a missed turnover disinfection is exactly where spore pressure climbs back. Setting the reorder rhythm to the cycle, so product arrives before it is needed rather than after a stockout, keeps the protocol continuous. For a multi-facility operation, consolidating that reorder across sites also gives procurement the volume to negotiate account pricing it could never get buying ad hoc per building, which is a cost argument an owner appreciates alongside the compliance one.
It is worth being concrete about what the audit package in Step 5 actually contains, because "documentation" is a vague word and auditors do not credit vague. The package is a chain: the Step 1 baseline that shows where the facility started, the Step 2 protocol that shows what you committed to do, the Step 3 turnover logs that show the rooms were reset between crops with product and contact time recorded, the Step 4 air readings that show the load was measured and held across the cycle, the product labels and SDS that document what you used and its EPA status, and the record of any corrective action when a reading ran high and what you did about it. Laid end to end, that chain answers the question an inspector is really asking, which is not "did you mean well" but "can you show me, with dated records, that this room was managed." A facility that can hand over that chain is in a different conversation with a regulator than one that can only describe its intentions.
The pre-harvest check itself is a decision point, not a formality. If the verification reading comes back clean, you proceed to harvest and test with confidence. If it comes back elevated, you have caught a problem while you can still act on it, before the mandatory finished-product test turns a manageable issue into a failed batch and a reportable event. That early-warning value is the whole reason the verification step exists before the state's test rather than relying on the state's test as the first signal. By the time a state lab tells you the flower failed, your options have narrowed to remediation or destruction; by the time your own pre-harvest reading tells you, you still have levers.
Step 6's standardization pays off differently for a single site and a multi-state operator, and the difference is worth drawing out. For a single facility, standardization means the protocol stops depending on one experienced grower's memory and becomes a written standard any trained crew member can run, which protects the facility the week that grower is on vacation. For a multi-state operator, standardization is the whole value proposition: one protocol, one product line, one set of verification thresholds, and one reporting format across every facility, so a Cultivation Director can look at a single dashboard and know whether the entire footprint is holding. The alternative, every facility running its own sanitation vendor and its own improvised protocol, is impossible to audit at scale and impossible to defend to ownership as a system. The standardization step is what turns a collection of rooms into a program.
Together, Steps 5 and 6 are what make the journey a loop rather than a line. You verify, you document, you learn, and you standardize, and then the next cycle starts from a higher floor than the last one did.
How the journey looks by role, and your next step
The six steps are the same for everyone, but which step matters most depends on who you are, so here is the journey read through each role, followed by how to begin.
For Steven, the Head Grower at a multi-room operation, the journey is about crop health and test compliance. Step 1's baseline and Step 4's air data are the center of gravity: a written diagnosis of where the facility stands and an ongoing trend line that catches rising pressure before a six-figure crop fails a test. The Head Grower's version of the journey is measurement-driven from end to end, because a positive mold result is the loss the whole program exists to prevent. What the Head Grower gains that the grow guides never offer is early warning with a number behind it. A wilting plant or a smell is a late, ambiguous signal; a monthly air reading that ticks up is an early, specific one, and the difference between those two signals is often the difference between a save and a loss. For a grower whose reputation and whose crop value both ride on the finished-product test, trading a gut feeling for a trend line is the whole appeal.
For the Facility Manager at a single or small multi-room grow, Step 3 is the payoff. Cutting turnover from 3 to 5 days to under a shift, with a residue-free surface process the crew can run without evacuating, is the operational win that frees up production days. The Facility Manager feels the journey most in the turnover SOP. The second-order benefit is scheduling sanity: a turnover that fits inside a shift is a turnover you can plan around, which means the production calendar stops being hostage to an unpredictable multi-day airing-out. A manager who knows a room comes back the same day can schedule the next transplant with confidence instead of padding the calendar against a bleach-out that might run long. Predictability is its own form of capacity, and a residue-free, time-boxed turnover delivers it.
For the Cultivation Director at a multi-state operator, Step 6 is the one that matters. Standardizing one protocol, one product line, and one reporting format across every state turns a scattered set of facilities into a defensible, auditable system, and centralizing the air-quality data gives ownership one view of the whole footprint instead of a folder of disconnected reports. The multi-state reality is that every market has its own testing thresholds and its own regulatory temperament, so a protocol that is standardized where it can be and adapted where it must be is the only thing that scales. The Cultivation Director's nightmare is ten facilities each doing something slightly different, because that is impossible to audit and impossible to improve systematically; one person cannot hold ten improvised programs in their head. One written standard, with per-state adaptations noted explicitly and one dashboard of air-quality trends across the footprint, is what makes the role manageable. The journey is, for this person, the difference between managing chaos and managing a system.
For the Owner or Business Director, the journey is an ROI conversation. The math is blunt: one failed pre-sale mold test on a mature crop costs more than a year of a documented biosecurity program, which reframes prevention as an investment rather than a cost line. The journey gives an owner the written evidence to make that case internally and the compliance confidence to make it to a regulator. The reframe matters because prevention loses every budget argument when it is treated as a cost with no visible return, and wins most of them when it is set against the real number it protects. An owner who can put the value of a single flower room's finished crop next to the annual cost of the program is having a different conversation than one who sees only a line item for sanitation supplies. The documentation the journey produces is also what turns prevention from a claim into an asset: a licensed operator with a defensible, dated biosecurity record carries less regulatory risk, and less risk has a value an owner understands even when it never shows up as a failed test, because it is the failed test that did not happen.
For the Procurement or QA lead, the journey is about documentation and a clean supply path. SDS, EPA labels, and account-level pricing in one place, with a clear answer to which product carries the "Not for use with/on plants/crops/feed" disclaimer and which is the EPA-registered disinfectant, so purchasing never misorders. Step 2's product selection and Step 6's reorder cadence are the parts a procurement lead lives in. The misorder this prevents is a real one: ordering the fast-release gas for a room with a crop in it, or treating the non-registered air product as if it carried a kill claim, are exactly the mistakes a procurement process without clear product documentation makes, and both are compliance problems an auditor would flag. One clear reference sheet, kept on file, answers the "which product, which room, which claim" question before it becomes an error.
It is worth a short, honest explanation of what ClO2 is, because the top reason cultivators hesitate on this whole category is simply not understanding the chemistry. Chlorine dioxide is a compound with the formula ClO2, and despite the name it behaves very differently from the chlorine in bleach, both in its chemical structure and in how it works. One of its useful properties is that as a gas it distributes evenly through a space and penetrates into small areas a liquid cannot reach, which is why the gas products can manage the air of a whole room from a single correctly placed source. The ProKure line uses this chemistry in three forms: a water-activated liquid (V) for surfaces, a fast-release gas (G) for empty-room resets, and a slow-release gas (D) for continuous in-room air quality. You do not need a chemistry degree to run the program, but understanding that one active chemistry is being delivered three ways is usually enough to move a hesitant buyer from confusion to confidence.
The comparison every operator eventually makes is to the bleach and quaternary ammonium they are probably using now, so the journey addresses it head-on rather than dodging it. Bleach and quats leave residue and fumes, which forces crews out of a room while it off-gasses and leaves films on surfaces a crop will later touch. For surface work, ProKure V's distinction is that it disinfects hard, non-porous surfaces, carries real kill claims including mold and mildew, leaves no residue, and is suitable for use with plants in the room, which is the combination bleach and quats cannot offer for a between-cycle turnover near finishing plants. For the air, bleach does nothing at all, which is the point most operators miss: wiping surfaces was never going to manage the airborne and settled spore load that the D and G gases address. The swap is not product-for-product; it is a move from a surface-only, residue-heavy practice to a surface-plus-air program that leaves no residue and produces a measurable result.
If you take one idea from this whole journey, let it be this: the facilities that do not fail mold tests are not the ones with the strongest product, they are the ones with the most consistent process and the clearest records. Product matters, and the ProKure V, G, and D line is the right tooling for the jobs described here, but the win is in running the six steps the same way every cycle and keeping the documents each one produces, cycle after cycle, so the standard holds whether or not any single person is in the building that day. A facility can buy the best disinfectant on the market and still fail, if the turnover is rushed, the air goes unmeasured, and the records live in one person's memory. The journey exists to make the consistency and the documentation the default rather than the exception.
The next step is Step 1. Book an IPM and biosecurity assessment: we walk your facility, review your recent yeast and mold results, and give you a written baseline within about ten business days. From there the protocol, the turnover SOP, the monitoring, the verification, and the standardization follow in order. To start, reorder or shop the ClO2 line on shop.groclarity.com, pull product labels and SDS from prokuresolutions.com for your records, and book a Step 1 assessment or ask about a multi-facility program through the GroClarity contact form. This guidance is general and not legal advice; confirm your state's testing and remediation rules with your state regulatory agency, and see the product label for specific instructions and claims.
Related resources