
The Cannabis Dry Room Mold Prevention Protocol: A Between-Cycle and In-Cycle Playbook (2026)
A cannabis dry room mold prevention protocol has two halves: what you do to the empty room between lots, and what you do while cut flower hangs on the lines. Between cycles, strip the room, wash surfaces with a detergent, then disinfect with an EPA-registered product on a clean surface for its labeled contact time. In cycle, hold relative humidity at 55 to 62%, keep air moving without blowing straight on bud, and use a low-plant-contact approach to knock down airborne spore load. Then verify with a swab or air plate so you can prove it worked.
The dry room is the last place a six-figure lot can turn into a failed yeast and mold test, and it is the place almost nobody writes a real protocol for. If you landed here with live flower still on the plant, you are one step early: powdery mildew and bud rot on a standing canopy belong in botrytis bud rot prevention on live flower, not here. If you already have visible mold or a failed lab panel, skip the prevention reading and go straight to cannabis facility mold remediation, because salvage and prevention are different jobs. This page owns the 7 to 14 day window between cut-down and cure jar, when the room is holding humidity on purpose and botrytis is holding its breath.
GroClarity builds these protocols for commercial cultivators and pairs them with the ProKure Solutions ClO2 line (V, G, and D). The frame is simple: Built on Science. Backed by Results. The chemistry below is ProKure's approved language, used as written. The protocol around it is GroClarity's.
The dry-room mold risk window in plain language
Here is the part the SERP keeps skipping. The reason the dry room is dangerous is not that growers are careless. It is that the exact conditions that make flower dry slowly and keep terpenes intact are the same conditions botrytis wants.
Botrytis cinerea, the gray mold behind most bud rot, is a necrotroph. It feeds on dead and dying tissue. The moment you cut a plant down, every bud on the line becomes the stressed, sugar-rich, slowly-dying tissue that botrytis evolved to colonize. Aspergillus, the genus that drives a lot of total yeast and mold test failures, works a similar angle: it does not need a living host, it needs moisture, a food source, and still air. A dry room full of cut flower is a buffet for both.
The mechanics are worth understanding because they tell you where to intervene. A fungal spore is already on the flower when it enters the dry room; it rode in from the grow. Germination is the switch, and the switch is water. A spore sitting on a dry surface at 45% room RH does nothing for weeks. The same spore on tissue with a film of free water, at 62% RH and 68 degrees, can germinate in a day or two, push a hypha into the bud, and begin producing the next generation of spores that then seed every other bud sharing the air. That is the chain you are breaking: available water, germination, colonization, sporulation, spread. You cannot sterilize the incoming flower, so the entire protocol targets the two links you can actually control, which are available water (RH and airflow discipline) and airborne spore load (filtration and the in-cycle ClO2 layer). Everything below is one of those two levers.
The 55 to 62% relative humidity band is the trap. Dry the flower faster than that and you flash off the outer moisture, lock chlorophyll into the bud, and get a harsh, hay-smelling product. Dry it slower, in the 45 to 55% band that equipment vendors prescribe, and you protect quality but you also push the drying window out to two weeks, which gives spores more time to land and germinate. Most commercial dry rooms settle around 58 to 60% because that is where terpene retention and dry time balance. That setpoint is a quality decision and a mold decision at the same time, and the people who only talk about quality are leaving out half the equation.
Timing matters inside the window too. Days 1 through 3, the outer bud is still shedding free water and surface moisture is high; that is the first germination risk. Days 4 through 9, the bud equilibrates and the interior moisture migrates out, and dense colas with trapped internal moisture become the hidden risk, because the surface reads dry while the core is still wet. Days 10 through 14, if your RH discipline slipped at any point, that is when you see the fuzz. Risk is not flat across the window. It spikes early on the surface and late in the dense cores.
There is a business cost hiding in that biology, and no page in the top seven puts a number on it. A mature indoor lot that reaches the dry room already carries most of its final value: months of power, labor, nutrients, and canopy space are sunk. A failed total yeast and mold test at that stage does not cost you the test fee. It can cost the lot, which for a commercial batch runs into five and six figures depending on size and market. Against that exposure, an annual sanitation program built on a repeatable dry-room protocol is not a cost line; it is insurance on the most expensive inventory in the building. The Owner or Business Director who treats prevention as overhead is mispricing the risk. One avoided failure usually pays for a year of product and protocol, and the grower sleeps better for the other 364 days.
Short version: the slow dry that makes good flower is the same slow dry that invites mold, so the protocol has to manage the room, not just the setpoint.
Environmental targets, from the top of the SERP
The equipment and cultivation sites that rank for this query agree on the numbers more than they disagree, so start there and then go past them.
Temperature: 60 to 70 degrees F
Darwin Chambers states the band plainly: "stable temperature control within 60-70°F." DryGair lands slightly tighter at 60 to 68°F (15 to 20°C), and Willow Industries uses the same 60 to 70°F range. The agreement is real, so hold the room between 60 and 68°F and you are inside everyone's recommendation. Darwin's reasoning is worth keeping: terpenes evaporate above about 21°C (70°F), so the ceiling is a flavor decision as much as a mold decision. Run cold and you slow every metabolic process, including the fungal ones, but you also slow the dry and extend the window, so colder is not automatically safer.
Relative humidity: 45 to 62% depending on stage
This is where the sources spread, and the spread tells you something. Darwin prescribes 45 to 55% for drying and 60 to 65% for curing. DryGair says 50 to 60%. Willow uses a wider 45 to 65% operating envelope. MIABIS, from its SERP snippet, calls 50 to 60% the ideal.
Why the spread? Because RH target depends on where you are in the dry and how dense your flower is. Early, with high surface moisture, the lower end (48 to 52%) pulls free water off fast and shrinks the surface-germination window. Later, as the bud equilibrates, nudging up toward 58 to 60% keeps the dry even and protects the final moisture content so you do not over-dry. The vendors are not contradicting each other; they are each describing a different slice of the same curve. Pick your setpoint by stage, not by copying one number off one page.
Airflow: circulation without impingement
Every source wants air moving. None of them wants air blowing directly on the bud. Direct impingement dries the windward face of a cola while the leeward face and the core stay wet, which is how you get a bud that is crispy outside and moldy inside. Aim for gentle, room-scale circulation that turns the whole air volume over several times an hour, with fans pointed at walls or the ceiling, never at the racks. Darwin ties "adequate ventilation to prevent mold and ensure even drying" to the same control systems that run temperature and humidity; treat airflow as part of the envelope, not an afterthought.
Here is the integration most pages miss. Airflow, dehumidification, and filtration are not three separate settings; they are one envelope that either holds or leaks. The dehumidifier sets the RH. Circulation carries moisture from the bud surface to the dehumidifier coil so it can actually be removed, which is why a dead zone behind a dense rack stays wet even when the room average reads fine. HEPA or inline filtration pulls spores out of that moving air before they settle. Break any one leg and the other two cannot compensate: a strong dehumidifier with no circulation dries the room unevenly, strong circulation with no filtration just moves spores around faster, and filtration with poor RH control cleans air that keeps reseeding itself. Cleanleaf lists HEPA as a control and it is a real one, but it only earns its keep inside a room where air is already moving and moisture is already leaving.
Light: near zero, and here is why
Keep it dark. Light degrades cannabinoids and terpenes in cut flower the same way it does in stored product, and there is no drying benefit to offset the loss. Darwin sells black-out strip curtains specifically so staff can enter without flooding the room with light. The mold connection is indirect: a dark room is usually a sealed, stable room, and stability is what starves fungal blooms. A room that stays dark also stays closed, and a closed room holds its RH and temperature setpoints instead of swinging every time a door opens to daylight. Those swings are what trip condensation on cool surfaces, and condensation is free water, which is the one thing you spent the whole protocol removing. Treat light discipline and door discipline as the same rule: the fewer times the envelope is broken, the fewer chances the room gets to drift into the mold band.
Surfaces: stainless, sealed concrete, epoxy
Darwin is specific that a dry room "should be constructed with materials that resist mold and are easy to clean, such as stainless steel, sealed concrete, or epoxy-coated surfaces." That is correct and it is the foundation the whole sanitation protocol rests on, because you cannot disinfect a porous surface. If your lines, racks, and walls are bare wood or unsealed drywall, no chemistry will reach the spores living in the grain. Fix the substrate first. Then the protocol below actually works.
The between-cycle turnover protocol (empty room)
This is the section the top seven results do not have. Darwin, DryGair, MIABIS, and Cleanleaf all prescribe humidity and temperature bands. None of them publishes a step-by-step protocol for what to do to the empty dry room between harvest lots. That gap is the whole reason this page exists, because the Head Grower and the Facility Manager both need this sequence and cannot find it anywhere above.
Run every step with the room empty, flower already moved to cure, and the HVAC in a cleaning mode. Budget 3 to 5 hours; a failed CFU test on the next lot costs far more than an afternoon.
Step 1: Physical removal
Strip the room. Pull down lines, take out racks, bag and remove every scrap of trim, leaf litter, and fallen bud. Fungal spores live in plant debris, so anything organic that stays in the room is a seed bank for the next lot. This step has no chemistry and it is the most important one, because disinfectant applied over debris only cleans the debris.
Step 2: Detergent wash
Wash hard surfaces with a surfactant detergent and rinse. The point is not disinfection yet; it is removing the soil, biofilm, and residue that would otherwise shield spores from the disinfectant in Step 3. A clean surface is a precondition for a disinfectant working at its labeled contact time. Skip this and your contact-time math is fiction.
Step 3: EPA-registered surface disinfection with ProKure V
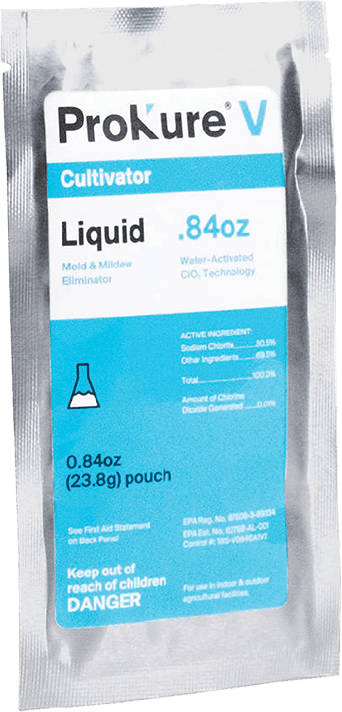
On a clean, pre-washed surface, disinfect with ProKure V, a water-activated ClO2 liquid. ProKure V is a Hospital-Type Disinfectant, EPA Reg. No. 87508-3-89334, and its label directs an exposure time of 10 minutes at 100 ppm to disinfect hard, non-porous surfaces. Application sites on the label include cultivation rooms, grow beds, drying rooms, cure rooms, and drop-down hoses, so the dry room is explicitly in scope. ProKure V leaves no residue and is suitable for use with plants in the room, which is the combination bleach and quats cannot claim, and it is why cultivators reach for it on surfaces that flower will later touch.
Mix per the label: one 0.17 oz pouch to one gallon, or the 0.84 oz pouch to five gallons, to hit 100 ppm. Apply to visible wetness on grow beds, benches, trays, line hardware, and tool surfaces. Hold the 10-minute contact time. Discard any activated solution within 15 days of activation, and record the activation date on the container, because a stored ClO2 solution weakens past that window.
GroClarity note for the Facility Manager: ProKure V ships from shop.groclarity.com with the SDS and EPA label in the box, so the documentation lands in your compliance binder the day the product arrives. See ProKure V on the store (shop.groclarity.com) for the quart and gallon SKUs.
Step 4: HVAC, dehumidifier, and drain service
The room is clean; now service the equipment that moves and conditions the air. Pull and clean the dehumidifier coil and the condensate drain pan, because standing water in a pan is a spore incubator that reseeds a clean room in days. Change filters. Darwin flags that a dehumidifier is "crucial" for holding the 45 to 55% band; a fouled coil quietly loses that capacity, and a room that drifts to 68% RH overnight undoes every earlier step.
Step 5: HEPA and air-plate baseline
If the room runs HEPA filtration, confirm the unit is sealed and the media is in service life. Cleanleaf lists "HEPA air filtration to remove spores" as a core control, and it is a real one, but a HEPA unit with a bypassed gasket filters nothing. Then pull a baseline air plate: a settle plate or an impaction sample on the now-clean room tells you the starting spore load before any flower goes in. That baseline is your proof the turnover worked, and it is the number you compare against mid-cycle.
Step 6: Documented re-entry and load-in
Log it. Date, who ran the protocol, which steps, the ProKure V activation date and lot, the air-plate baseline, and the re-entry time. This log is the data trail the Facility Manager asks for ("no visible data proving the sanitation actually worked") and the artifact a state auditor wants to see. Then load the next lot into a room you can prove was clean.
For a Cultivation Director running this across four to fifteen facilities, write the six steps once and lock them as the standard, then let each site fill in only the room-specific variables: square footage, the ProKure V SKU that matches the water volume, the HVAC make, and the local lab. A protocol that reads the same in every state is the thing an auditor trusts and the thing that keeps a new grower in a new market from improvising. The variable is the room; the sequence is not.
That six-step sequence is the HowTo at the center of this protocol. Everything else supports it.
The in-cycle protocol (occupied room, flower on lines)
Now the hard part. Flower is hanging, the room is at setpoint, and you still have to manage spore load without putting residue on bud or applying anything the label does not allow near drying flower.
Why residue-leaving chemistry is off the table here
You cannot wipe a drying cola with a disinfectant, and you cannot fog an occupied dry room with a product that leaves a residue the flower will absorb. Anything you apply in cycle has to be something that acts on the air and the room, not on the bud, and that dissipates without leaving a film. This is the constraint that rules out most sanitation chemistry for the occupied window and narrows the options to controls and gas-phase treatment. Think about what the flower is doing in the dry room: it is a sponge slowly giving up water, and anything in the air or on a surface it contacts can be drawn into the tissue as that moisture moves. A liquid disinfectant that is perfect for an empty steel rack becomes a contamination risk the second it is applied to a surface a cola rests against, because the residue does not stay on the steel, it transfers. That is why the between-cycle and in-cycle halves of this protocol use different tools on purpose. The empty room gets the liquid surface disinfectant; the occupied room gets controls plus a gas-phase air-quality layer that dissipates rather than deposits. Mixing those tools across the wrong window is the mistake that turns a sanitation step into a compliance problem.
The low-plant-contact ClO2 option: ProKure D
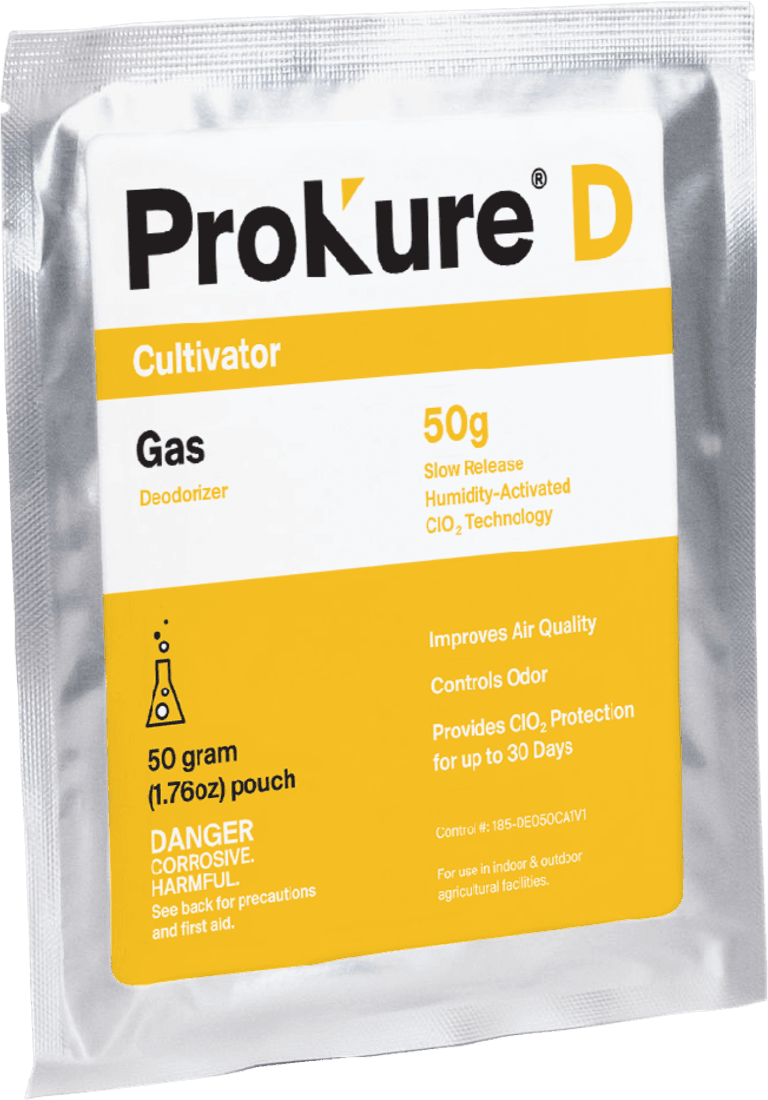
For ongoing air quality in a room with plants present, ProKure D is a slow-release ClO2 gas that provides ClO2 protection for up to 30 days. It ships as pouches and trifolds (10 g, 50 g, and 95 g) that hang on a stable surface or from the ceiling, and it improves air quality and controls odors across the cycle without a labor spike. Because the dry window is 7 to 14 days, a single placement covers it with margin.
Read this disclaimer and keep it on the page: ProKure D is not an EPA-registered product and not labeled for sale as a pesticide under 40 CFR. That means D is an air-quality and odor product, not a pesticide and not a kill-claim product. Do not represent it as disinfecting the flower or killing a specific organism, because the label does not support that and the compliance exposure is not worth it. Use it for what it is: a steady, hands-off ClO2 air-quality layer in a room that contains plants.
Size it by room volume: the 10 g pouch treats roughly 1,000 cubic feet, the 50 g roughly 4,000, the 95 g roughly 8,000, and you place multiple units equally apart in a larger room. Keep the pouch sealed, never open the white inner pouch, and never apply it to cured flower in a sealed jar, because the fit is the open dry room, not the container.
If you need a harder knockdown between micro-batches
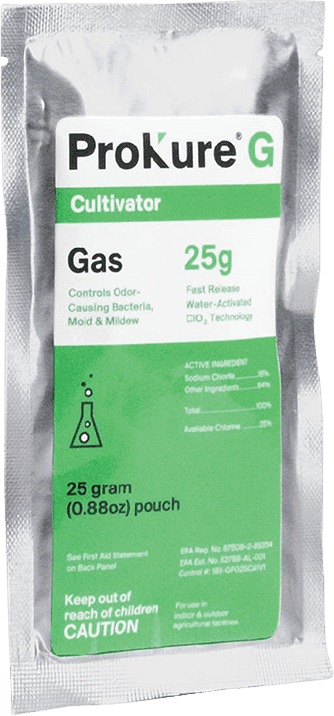
Some facilities stagger lots and get a short empty window mid-week. If the room clears, ProKure G is the fast-release ClO2 gas that works in 4 to 6 hours for a quick air reset, with a one-hour ventilation before re-entry. G carries its own required instruction: Not for use with/on plants/crops/feed. So G is an empty-room tool only. It is the fast air reset between micro-batches; D is the in-cycle, plants-present layer. Do not mix those roles.
Continuous controls and spot response
Chemistry is the backstop, not the plan. The plan is RH discipline. Put a calibrated hygrometer in the room, not just the one on the controller, and spot-check it against the setpoint twice a day. Ares Scientific notes that good drying equipment holds "within 1-degree C and 3 percent humidity," so if your readings wander more than that, the control loop is drifting and mold risk is climbing. When you find a hot node, a single bud showing early fuzz, pull that whole plant or that section of line immediately, bag it, and remove it from the room before you touch anything else, because handling a sporulating bud and then a clean one is how one node becomes a lot-wide failure.
The verification loop: proof the protocol worked
No page in the top seven tells a grower how to prove sanitation worked. That silence is the Facility Manager's exact pain, and it is a snippet nobody owns. Verification is three measurements and a log.
ATP swab
An ATP (adenosine triphosphate) swab reads the organic residue left on a surface and returns a relative light unit (RLU) number in seconds. It does not identify mold specifically; it tells you how clean a surface actually is after Step 3. Set an internal pass threshold (many facilities use a low RLU ceiling they validate against their own CFU results) and swab the same high-touch points every turnover. ATP is your fast, same-shift check that the wash and disinfection landed. Swab the same five to eight spots each time: line hardware, the rack rails flower touches, the dehumidifier return, a wall near the floor, and the drain pan lip. Consistency is what makes the number mean something, because a rising RLU on the same spot across three turnovers is a trend you can act on, while a one-off reading on a random surface is noise.
Air-plate sampling, before and after
Air plates (settle plates or impaction samplers) catch what is actually floating in the room. Pull one on the clean empty room as your Step 5 baseline, then pull another mid-cycle with flower present. If the mid-cycle count is near baseline, your controls are holding. If it climbs, you have a source, and you look at RH drift, a fouled drain pan, or a hot node before it becomes a test failure.
Third-party CFU testing for yeast and mold
The air plate is your early warning; the third-party total yeast and mold (TYM) lab test is the one that gates sale. Send representative samples to an accredited lab before the lot moves, because the state pre-sale panel is the number that actually stops a sale. The dry-room protocol exists to make that lab result boring. Pull your samples the way the state expects, from representative points across the lot rather than a single convenient jar, because a clean sample from a hot lot buys you nothing when the retail-tested unit fails downstream. Track your in-house air-plate trend against the lab CFU result over several lots and you will build a private calibration: you learn which air-plate counts predict a comfortable pass and which predict a close call, so you can hold a borderline lot for an extra day of dry-down before you ever pay for the official test.
Data log for auditors
Fold ATP numbers, air-plate counts, lab CFU results, product lots, and activation dates into one running log per lot. That document is what turns a protocol into compliance confidence, and it is what the MSO Cultivation Director standardizes across facilities so every state reads the same binder.
State CFU compliance context and the which-SKU-when decision
Two things close the loop: where the protocol sits relative to the law, and which product you reach for in which room state.
Why the dry-room protocol is upstream of the pre-sale test
The lab test does not prevent mold; it detects it, after the lot is finished, when your options are narrow and expensive. The dry-room protocol is upstream, which is the only place prevention is cheap. Every control above exists to drive the downstream TYM count under the state threshold before the sample ever reaches the lab. For the lab-side workflow, thresholds, and how the pre-sale test runs, hand off to yeast and mold CFU compliance testing for cannabis.
State total yeast and mold thresholds vary, so confirm the live number
State pre-sale TYM limits differ by jurisdiction and change by rule, so this page does not publish a fixed CFU-per-gram number as if it were current. States including Colorado, California, Michigan, Massachusetts, Florida, Oklahoma, and Illinois each set their own yeast and mold requirements, and some use TYM while others break out specific Aspergillus species. Confirm your state's active threshold against the current state regulator rule before you build a testing plan, because quoting a stale limit as current is how a compliant lot gets held. For MSO Cultivation Directors standardizing across states: GroClarity builds the protocol once and appends a state-specific threshold table per facility, so the SOP reads the same everywhere and the appendix carries the local number. See the handoff in CFU compliance testing for the per-state breakdown.
Which ProKure SKU, when
Growers misorder because nobody draws the decision clearly. Here it is.
| Room state | Product | Form | EPA disclaimer required | --- | --- | --- | --- | Empty room, between-cycle surface disinfection | ProKure V | Liquid, 100 ppm, 10 min contact | EPA Reg. No. 87508-3-89334; follow label | Occupied dry room, plants present, ongoing air quality | ProKure D | Slow-release gas, up to 30 days | Not an EPA-registered product; air quality and odor only | Empty room, fast air reset between micro-batches | ProKure G | Fast-release gas, 4 to 6 hours | Not for use with/on plants/crops/feed |
Read the table as a sequence, not a menu. V cleans the empty room on surfaces. D rides along with the flower for air quality. G is the fast reset when the room clears. The order mirrors the cycle, and the EPA column is the thing purchasing most often gets wrong. The single most common misorder is treating D and G as interchangeable because both are ClO2 gas. They are not. G is fast and empty-room only, carrying the "Not for use with/on plants/crops/feed" instruction, and it finishes its work in 4 to 6 hours. D is slow, plants-present, air-quality only, and runs up to 30 days. Order G for the occupied dry room and you have bought a product you legally cannot deploy with flower on the lines; order D for a fast empty-room knockdown and you will wait a month for an effect you needed in an afternoon. The form is the same gas; the job is opposite. Match the product to the room state in the table and purchasing stops guessing. Procurement and QA leads get one URL for every SDS, label, and EPA registration number, and account-level pricing, when they open a GroClarity account; buy and reorder on shop.groclarity.com, and pull deep ClO2 chemistry detail, labels, and SDS from prokuresolutions.com.
What to do if you already have mold, and FAQ
If you are reading this with visible mold on cut flower, stop treating it as a prevention problem. There is no safe home salvage for moldy cannabis flower: you cannot wash it, you cannot ozone it back to compliant, and a lot that fails TYM does not become sellable by re-testing. Isolate and bag the affected product, protect the rest of the lot, and move to the remediation workflow. Hand off to cannabis facility mold remediation, and if the lab panel already failed, pair it with CFU compliance testing to understand the disposition rules. Then come back to this protocol for the next lot, because the next lot is the one you can still save.
What is the ideal humidity level for a cannabis drying room?
Hold the dry room between roughly 55 and 62% relative humidity, with the lower end (about 48 to 52%) early in the dry when surface moisture is high and the upper end (58 to 60%) later to keep the dry even. Published bands from equipment and cultivation sources span 45 to 65% depending on stage. Pair the RH setpoint with 60 to 68°F and gentle circulation so flower dries slowly without feeding botrytis.
What humidity inhibits mold growth?
Below about 60% relative humidity, most molds that threaten drying cannabis slow sharply, and below 50% they struggle to germinate on surfaces. The catch is that drying flower below 50% too fast damages quality, so you cannot simply crank the dehumidifier. The working answer for a dry room is to hold RH in the high-50s, keep air moving, and remove free water early, rather than chasing a single bone-dry number.
How to prevent mold while curing?
Curing runs a touch more humid than drying, usually 58 to 65% inside the jar or container, which means spore control shifts from the room to the container. Burp jars on a schedule to release trapped moisture and refresh the headspace air, pack only fully-dried flower, and sanitize containers before filling. For the live-plant and veg-room side of prevention that precedes all of this, see preventing powdery mildew in the grow room.
Is it possible to get rid of mold on cannabis after it's dry?
No, not safely for sale. Once mold has colonized dried flower, the mycelium and spores are through the tissue, and surface treatments do not make a failed lot compliant or safe to consume. Remediation options like ozone or radiation are facility-scale interventions with their own rules, not a home fix, and a lot that fails a state TYM panel is generally not salvageable for retail. Prevent it in the dry room; if it is already there, move to the remediation protocol.
Can I use bleach in the dry room?
Bleach can disinfect an empty, pre-washed hard surface, but it leaves residue and harsh fumes, and it is not something you want near drying flower or on surfaces flower will touch without a thorough rinse. For the empty-room step, ProKure V is a residue-free, EPA-registered (87508-3-89334) alternative that is suitable for use with plants in the room and leaves no residue, which is the reason cultivators move off bleach for cultivation surfaces.
Is chlorine dioxide gas safe around drying flower?
ProKure D is a slow-release ClO2 gas designed to improve air quality and control odors in occupied rooms, including rooms with plants, across a window of up to 30 days. It is not an EPA-registered product and not labeled for sale as a pesticide under 40 CFR, so treat it as an air-quality layer, not a disinfectant or kill-claim product. Follow the label, never open the inner pouch, and size placement to room volume.
What is the EPA registration status of ProKure D?
ProKure D is not an EPA-registered product and not labeled for sale as a pesticide under 40 CFR. Its approved claim is that it improves air quality and controls odors and provides ClO2 protection for up to 30 days. By contrast, ProKure V (EPA Reg. No. 87508-3-89334) and ProKure G (EPA Reg. No. 87508-2-89334) are EPA-registered. Match the claim to the product, and keep D in the air-quality lane.
Related resources